Tuesday, November 18, 2008

project


For our final project: a little web application...

Your client, Bazaar Ceramics, currently runs a brochure web site to display their products. After conducting a gap analysis they have decided to include e-commerce functionality into this site. It is intended that the brochure site be extended to include an online catalogue and an ordering system. Initially they want to develop a prototype to test the feasibility of the e-commerce system. The prototype will implement a limited database, online catalogue and ordering system. The specifications for the prototype is shown below.

Prototype specifications

Database

A MySQL database will be developed with three tables:

o products. The products table has the following fields:

§ productid (primary key, not null, auto increment)

§ productname

§ productdesc

§ colour

§ price

§ imagepath (this will need to be the relative path that you would use in an img tag – eg images/products/product1.jpg)

o customers. The customers table has the following fields (add more if you wish)

§ customerid (primary key, not null, auto increment)

§ gname

§ fname

§ email

§ address

o purchases. The purchases table is used to store information about the products the customer wishes to order (the shopping cart).

The table has the following fields:

§ invoiceid (primary key, not null, auto increment)

§ customerid

§ cart. There are a number of ways of implementing this. To keep it simple you could declare the cart of type varchar(255). The cart variable could then be a list of comma delimited values.

For example if the customer purchases 5 boxes of blank cd’s (productid = 1) and 3 bunches of roses (productid=2), then the cart variable should have the value set to 1,5,2,3. This will require some processing in your PHP script to format the cart data correctly.

HTML Forms and PHP

Create a web page (getCustomerDetails.htm) that displays a form to gather customer details. See figure 1. When the user clicks the submit button, the form data should be posted to a PHP script (processCustdetails.php) for validation.

If the data is valid, this script should add the customer details to the database and a confirmation page with the customer’s id should be displayed. See figure 2.

If the data is not valid, the getCustomerDetails.htm page should be displayed again.

Figure 1: getCustomerDetails.htm

Figure 2: Response from valid processing

  1. Create a web page (showCustomers.php) that displays a list of names for all the registered customers. Next to each name include links to 2 php pages: deleteCustomer.php (which deletes that customer when called) and editCustomer.php, which loads the customer details into a form for editing (and which calls a third page: updateCustomer.php. After executing deleteCustomer.php or updateCustomer.php the user should be redirected back to the showCustomers.php page. At the bottom of the showCustomers.php page should be an ‘Add a customer’ link to the getCustomerDetails.htm page you created earlier.

Deliverables

Create the customers table in your MySQL database. Upload all your htm and php files and submit a URL to the showCustomers.php page for testing.


Image: 'Mainile Olarului | Hands of a Potter'
www.flickr.com/photos/14721869@N02/2680418274

Tuesday, September 16, 2008

fleshing out the TAFE database app


Sorry folks, I'm afraid I can't be with you in person again today as I'm due for some irradiation - but I'll put together some notes to keep you going...

Last week we built a bit more of our TAFE database application (current dump available from: http://bathurst-tafe.nsw.edu.au/~pshanks/icab4136a/fred2.sql). We creat pages that allowed us to add new students and subjects. Then we went on to start building an update page for our courses.

From memory we made a page that lists each course with a link next to each saying something imaginative like: Edit

HTML code something like:
<a href="courseedit.php?courseid=<?php echo $row['courseID'] ?>"<?php">">Edit</a>

So, what happens on the courseedit.php page?

Well, we need to retrieve the target course record for starters, which is going to need something like this...

<?php
$dbcnx = mysql_connect("localhost", "root", "");
mysql_select_db("fred");
$results = mysql_query("select * from courses where courseID = ".$_GET['courseID']);
$row = mysql_fetch_array($results)
?>

The magic happens because $_GET['courseID'] picks up the courseID that's being passed to the page in the URL.

From here it's a simple matter of plugging the values into a form so that people can edit them. We already built a similar form for adding new records, so let's cut and paste and edit slightly to get this:

<h1>Edit a course</h1>

<form method="post" action="courseedit2.php">

Course Name: <input type="text" name="coursename" value="<?php echo $row['course'] ?>" >

<input type="hidden" name="courseID" value="<?php echo $row['courseID'] ?>" >

<input type="submit" value="Update Course Info" >

</form>

Note how we've added a value to the textbox from the record we retrieved.

We've also added a new bit of data in a hidden field, the courseID for the record we're editing. This information is needed when we update the record on the courseedit2.php page, which is going to look a bit like this:

<?php

$dbcnx = mysql_connect("localhost", "root", "");

mysql_select_db("fred");

$sql = 'UPDATE `fred`.`courses` SET `course` = \''.mysql_real_escape_string($_POST['coursename']).'\' WHERE `courses`.`courseID` = '.mysql_real_escape_string($_POST['courseID']).' LIMIT 1;';

$results = mysql_query($sql);

if ($results == true) {

echo 'Updated course '.$_POST['coursename'];

} else {

echo 'Could not update course '.$_POST['coursename'];

}

?>

What's happening here?

Firstly, I picked up the update code by editing a course record in phpMyAdmin and looking at the generated sql.

I edited the code provided there so that it picked up values from the form on the corseedit.php page, getting the course from the textbox and the courseID from the hidden field - this courseID ensures that you just update the one, specific record in the table (WARING: if you enter SQL like this: update courses set course = 'newcoursename' it will replace every single record's course field with "newcoursename". Usually you don't want that sort of thing to happen)

Armed with this example it shouldn't be too hard for you to extend yourself to a set of pages to list all students with edit links and create a pair of edit pages for student records. The only trick will be pre-selecting the course they are currently enrolled in.

Here's how to approach this one...

As you loop through the courses when creating the options in the course select box, compare their courseID with the student.courseID, if they match add a bit of code to the option that says "selected". Assuming you have one recordset for the target student that returned a $studentrow record and a bunch of records for all the courses being held in $courseresults the code would look like:

while ($courserow = mysql_fetch_array($courseresults)) {

echo '<option value="'.$couserow['courseID'].'"';
if ($cousrerow['courseID'] == $studentrow['courseID']) {
echo ' selected ';
}
echo '>'.$courserow['course'];

}

Give each other some help getting this all together (along with a studentedit2.php page) and then try your hand at getting a subject edit suit together.

My fingers are aching now, so I'm going to sign off - good luck with your mission. I'm hoping to see you tomorrow or Thusday, so you can let me know how you got on.

Tuesday, September 2, 2008

putting the C back in CRUD


today we're going to look at how to create new records.

But first, an update for the database (now with new, improved test data) and a little exercise based on last week's lesson.

To update your database, download fred2.sql and import it into your development environment.

Now, I'd like you to create 2 new pages:

choosesubject.php which lists all the subjects in the database and lets the user pick one before calling...

showstudents.php - a page that lists all the students enrolled in that subject.

You can see the comments for my solution to this problem, but do have a good try at it first (hint: you will need to do a join in your query to list the student records for the subject's course).

And now, on to creating new records...

Believe it or not, this is easier than our previous tasks. Again we need 2 pages, one to get the information and another to insert it into the database.

For example, let's look at how we could add a new course to the database. We need a form that gets the new course name (addcourse.php) and then submits it (addcourse2.php).

Here's how addcourse might look:

<h1>Add a new course</h1>
<form method="post" action="addcourse2.php">
Course Name: <input type="text" name="coursename">
<input type="submit" value="Create Course" >
</form>

once it's sent to addcourse2.php we just need to extract the value in our coursename text box and plug it into the right bit of SQL.

To find out what that SQL should look like I recommend a quick visit to phpmyadmin.
  1. Select the courses table and click on the 'insert' tab.
  2. Enter a test record (type 'test' into the course name field) and click 'go'
  3. have a look at the code that's produced. Something like...
    INSERT INTO `fred`.`courses` (
    `courseID` ,
    `course`
    )
    VALUES (
    NULL , 'test'
    );
  4. Note the syntax... Insert into [table] ([field list]) values ([value list]);
  5. Click on the link: 'Create PHP Code' and copy the line:
    $sql = 'INSERT INTO `fred`.`courses` (`courseID`, `course`) VALUES (NULL, \'test\');';
  6. Plug that line into a typical mysql_query function to get something that looks like this code for your addcourse2.php file:
<?php
$dbcnx = mysql_connect("localhost", "root", "");
mysql_select_db("fred");
$sql = 'INSERT INTO `fred`.`courses` (`courseID`, `course`) VALUES (NULL, \''.mysql_real_escape_string($_POST['coursename']).'\');';
$results = mysql_query($sql);
if ($results == true) {
echo 'Created new course '.$_POST['coursename'];
} else {
echo 'Could not create new course '.$_POST['coursename'];
}
?>

easy, yes?

for next week, try making a pair of pages for adding new students. These will be very like the two above except that you need to get a courseID for the student as well as their name. It's best to limit the user's choices to existing courses only by using a select box with a dropdown list.

Image: 'Letter C, in Neon (Crazy California)'
http://www.flickr.com/photos/66606673@N00/429154325

Wednesday, August 27, 2008

pulling it all together


finally, finally we got some traction using php to retreive records...

we kicked off by building a little page to display all the subjects in our database (if you need the tables and data, download http://bathurst-tafe.nsw.edu.au/~pshanks/fred.sql and run it using the phpmyadmin import dialog) . To reproduce our efforts, create a page called showsubjects.php and include the following code in the body area...

<?php

$dbcnx = mysql_connect("localhost", "root", "");
mysql_select_db("fred");
$results = mysql_query("select * from subjects where courseID = ".$_POST['coursenumber']);
while ($row = mysql_fetch_array($results)) {
echo $row['subjectID'].' - '.$row['subject'].'<br />';
}
?>

Now, add a where clause to the sql statement so that you're diplaying just the Cert IV general subjects (hint: the courseID = 1)... I've put the solution in the comments for this post.

Getting the subjects for any particular course is fine if you don't mind editing the sql, but we can do better by creating a page with a form on it that passes a value to our showsubjects.php page.

Create a new page called choosecouse.php with the following code in it:

<form method="post" action="showsubjects.php">
Which course?
<input type="text" name="coursenumber" >
<input type="submit">
</form>

This form will post the contents of the text box called 'coursenumber' to the showsubjects.php page when the submit button is clicked.

To get showsubjects.php to use this information we need to update our sql statement to read the $_POST variable that is passed to it...

<?php

$dbcnx = mysql_connect("localhost", "root", "");
mysql_select_db("fred");
$results = mysql_query("select * from subjects where courseID = ".$_POST['coursenumber']);
while ($row = mysql_fetch_array($results)) {
echo $row['subjectID'].' - '.$row['subject'].'<br />';
}
?>

All well and good, so long as our user knows and can remember the courseID they're after (which is unfair). A better solution is to restrict their input to just the course nubmers available. Instead of a text box we can put a drop down select list on the choosecourse.php page...

<form method="post" action="showsubjects.php">
<select name="coursenumber" >
<option value="1">Cert IV general
<option value="2">Cert IV web
<option value="3">Cert II I.T.
</select>
<input type="submit" />
</form>

Nearly done, but what if someone adds a new course to the database. Should we make our customer pay for a web developer to update the choosecourse.php page?

Certainly not! We could use php to select all the records in the courses table and dynamically create a select list. Hava a crack at it (the solution is in the comments for this post).


Image: 'harder! Pull!'
http://www.flickr.com/photos/44124421254@N01/184140074

Tuesday, August 19, 2008

crash and burn


After a disastrous attempt to move and run our mySQL server on the bathurst-tafe server we ended up with little time for actual learning - my appologies all.

We did get to write a very basic page to list the students enrolled in our Cert IV web course (courseID 2)...


<?php
$dbconnection = mysql_connect("localhost","root","");
mysql_select_db("fred");
$sql = 'SELECT * FROM `students` WHERE courseID = 2 LIMIT 0, 30 ';
$results = mysql_query($sql);
while ($row = mysql_fetch_array($results)) {
echo $row['name'].'<br />';
}
?>

Image: 'untitled'
www.flickr.com/photos/62674889@N00/46266892

Thursday, August 14, 2008

coding in php


This week we're looking at how to extract data from our database and display it in the web browser.

To do this we need to have some way of programming the web server's computer - and we'll be using php, a server-side scripting language.

Rather than write it all down here, I've uploaded the first four chapters of a real live book on the subject: Build Your Own Database Driven Website Using PHP & MySQL. Grab a copy and work through chapters 3 and 4 (ch. 1 and 2 are interesting too, but we know that stuff already :-).

This week's challenges:
  1. Create a web page that displays all the records we have in the courses table we created last week.
  2. List the subjects for course number 1 (Cert IV general)
Next week we're going to create a form that lets us query the database for specific data.

Image: 'Will code for food'
www.flickr.com/photos/67523311@N00/114420037

Tuesday, August 5, 2008

joining stuff back together


Being selective

Now that we've split up our data into student, course and subject tables we can start looking at how to extract information from them by putting them all back together again :-P

We do this with our tried and true select statement - listing the fields (now for each table we're interested in), the tables, and how they are related to each other.

For example, to list all the students and which courses they are enrolled in we would enter:

SELECT name, course
FROM `students`, courses
WHERE students.courseID = courses.courseID

Try to list all the courses and their subjects with a similar query.

Really being selective

To restrict the results to just the student called 'John' we add to the where clause using AND...

SELECT name, course
FROM `students`, courses
WHERE students.courseID = courses.courseID
and name = 'John'

Try this with your earlier subjects query, restricting it to just show the subjects for 'Cert IV General'

Restricting rows on a key field

We can also restrict rows using numeric values (for a primary or secondary key, for example). So we could find all students studying the Cert IV web course using this query:

SELECT name, course
FROM `students`, courses
WHERE students.courseID = courses.courseID
and courses.courseID = 2

note: since there is a courseID in both the students and the courses table we need to tell the database engine which one we're using in the query. We do this by adding the table name to it: courses.courseID.

Try building a query that lists all the subjects for courseID = 1 (the cert IV general)

Pulling out all stops

Have a crack at listing all the courses, subjects and students from all three tables. (Hint: you will need to join the subjects and students tables and the courses and students tables). See the comments on this post for the answer.

Exercise your new-found knowledge by reading through and trying the examples in our course notes on joins (pages 11 to 14).

There's another way of connecting tables, using the Select .... from ... join ... using ... syntax, which is explained in these exercises on sqlzoo about joining tables, and this slightly more advanced joining tables lesson both are highly recommended.

Next week we take a little break from learning new SQL statements.

We're going to learn some new PHP statements instead :-)

see you then...

Image: 'cadillac ranch'
www.flickr.com/photos/42737578@N00/23249259

Wednesday, July 30, 2008

Joining up


So far we've looked at selecting information from a single table, which is nice, but a relational database is "all about relationships baby." In a nutshell: linking two or more tables together to eliminate errors and redundant data.

I'm not too happy about the way this is presented in the notes we used last week, so lets take this opportunity to create a few tables for ourselves.

The Scenario
Say we wanted to describe our combined CertIV class - the students, which course they were studying and the other subjects for each course.

We could put all this information in one table. Something like...

name course subject number subject
John Cert IV general ICAB4135A HTML
John Cert IV general ICAB4136A SQL
other John Cert IV web ICAB4136A SQL
other John Cert IV web ICAB4137A JavaScript
Kevin Cert IV web ICA4136A SQL
Kevin Cert IV web ICAB4137A JavaScript

You can see that John, other John and Kevin are all studying SQL, and that other John and Kevin are also studying JavaScript while John is styding HTML

There's a lot of redundant data here which is bad for 2 reasons:
  1. I'm lazy and don't like typing all that stuff in more than I absolutely have to, and...
  2. I'm not very careful and can easily mistype some information (for example leaving out the 'B' in 'ICAB4136A' in Kevin's SQL record.
Far better to break this data up into 3 tables, linking each with some sort of breadcrumb trail of primary and foreign keys...

courses

courseID course
1 Cert IV general
2 Cert IV web


students

studentID name courseID
1 John 1
2 other John 2
3 Kevin 2


subjects

subjectNumber courseID subject
ICAB4135A 1 HTML
ICAB4136A 1 SQL
ICAB4136A 2 SQL
ICAB4137A 2 JavaScript


So, there's less typing to get the information in, but a trade off in that now we have to do some more digging to get it back out.

For example, to find out what subjects Kevin is studying we have to get the courseID from his student record, and use it to look up records in the subjects table that have the same courseID.

Let's put this data into some real mySQL tables.

Fire up XAMPP (run xampp-control.exe). Start the apache and mySQL servers and open http://localhost in your browser. Now select phpMyAdmin from the tools menu and select the database we created last week.

Ready to create your first table?

Enter 'courses' in the table name and '2' for the number of fields...

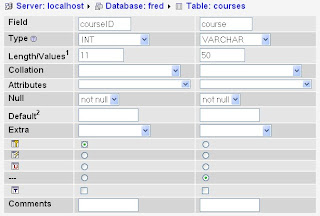
We're going to make our courseID an integer (max length 11 digits), and the course field a varchar (variable character width) with a maximum size of 50 characters.


Click on the 'Save' button to create your new table.

You can read more about the various mySQL field data types in the reference manual. Once you have your head around datatypes, click on the 'Database: fred' link at the top of the page and add the other 2 tables: 'students' and 'subjects'. Make sure that the courseID field in each is the same data type and size as the one we just made in the courses table. I'll leave it to you to decide what datatype to use for the studentID in the students table.

Time to enter some data.

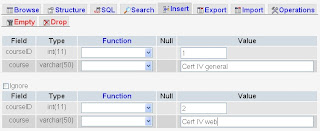
Click on the 'courses' table link in the left hand column of phpMyAdmin, then click on the 'Insert' tab at the top of the page and enter our two courses...


Click on the 'Go' button and you'll have 2 brand new records added to your table.

Bonus: you also get some free SQL script that shows how a hard core SQL programmer would do the same thing:

INSERT INTO `fred`.`courses` (
`courseID` ,
`course`
)
VALUES (
'1', 'Cert IV general'
), (
'2', 'Cert IV web'
);

Select and insert our data into the students and subjects table (you may have to click on the insert tab a couple of times to get it all in).

Whew... I'm getting tired here just thinking about all this, but before we go I suppose we should look at how to select our data from 2 tables.

Let's take our earlier example - listing all the subjects Kevin is studying.

Click on the SQL tab at the top of the page and enter this code:

SELECT name, subject FROM students, subjects WHERE students.courseID = subjects.courseID AND name = 'Kevin'

You should see that Kevin is enrolled in SQL and JavaScript.

As a quick exercise, try listing all the subjects along with their courses


Image: 'Join Us'
www.flickr.com/photos/16682940@N00/94736480

Tuesday, July 29, 2008

flexing some SQL muscle

To revise last week's lesson, try your skills out on these SQLzoo exercises.


www.flickr.com/photos/8377931@N02/2171053915

SQL like a stuck pig


Yahoo. Back for a new season of coding!

This semester we're going to spend a fiar slab of time learning structured query language (SQL to its friends).

To get into this we need to install a local web server, database server and database manager. Luckily someone has already put a package together for us to download and install. Xampp (38 MB from Apache friends) has everything an aspiring SQL guru could want.

After downloading and installing start the xampp control panel (it will be something like: C:\xampp\xampp-control.exe) and start up apache and mySQL by clicking on the start button for each.

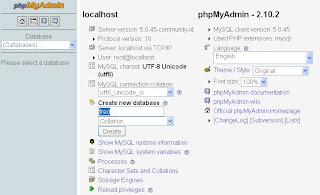
Now open your web browser and test the installation by entering http://localhost into the address bar. You should be seeing something like this (you may need to click on the 'English' link first)...


click on the phpMyAdmin link in the tools section of the left hand menu to start up our database manager.

Before we can start entering SQL statements we need to create a new database to work with.

In this screenshot I'm about to create a new database called fred (you can click on the image for a larger version).

Now that we have a database we need a couple of tables and some data to play with. I've put together a little file to make this as panless as possible. Download ICAU4205A.sql and save it on your computer.

Once you've got it, click on the 'Import' tab at the top of the phpMyAdmin screen, browse to the file and click on the 'Go' button on the bottom right of the screen.

phpMyAdmin should do its magic and report back that "Import has been successfully finished, 16 queries executed." You should also see 5 new tables listed in the left hand column.

Time to get down to business.

For the next couple of weeks we're going to work through James Hoffman's Introduction to SQL

This week, everything up to the section on joins. Click on the 'SQL' tab at the top of the phpMyAdmin page and type in each of the examples in the document. Play a bit, have fun, and tune in here next week for another exciting installment...


Image: 'OINK! OINK!'
http://www.flickr.com/photos/49968232@N00/51679641